10 Years Manufacturer Precision Casting Wax to Frankfurt Manufacturers
Short Description:
Product Detail
Product Tags
10 Years Manufacturer Precision Casting Wax to Frankfurt Manufacturers Detail:
Precision Casting Wax mainly is used for precision mechanical process with zero allowance or very limited allowance. We can not adopt general casting technique, but can only adopt zero allowance casting or precision casting. Because of the product’s structure is very delicate and complex especially in bejeweled with golden and silver, such as diamond ring, brooch, earring etc.
The characteristics of precision casting wax are: good coating property, no denaturalization to be heated, good flow ability, good thermal stability, and well surface finish.
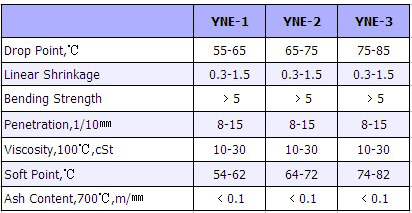
Product detail pictures:

We purpose to understand high quality disfigurement with the output and supply the top service to domestic and overseas buyers wholeheartedly for 10 Years Manufacturer Precision Casting Wax to Frankfurt Manufacturers, The product will supply to all over the world, such as: Bangkok , Slovakia , Borussia Dortmund , We are sincerely looking forward to cooperate with customers all over the world. We believe we can satisfy you with our high-quality products and perfect service . We also warmly welcome customers to visit our company and purchase our products.
Beekeeping enthusiasts,
Our new video shows a closeup step by step instructional how to for young beekeepers where we show the beeswax decapping process we follow to clean the frames, remove the cappings, and prepare the frame for extraction in a centrifugal frame extractor.
There are many ways beekeepers choose to remove the cappings from their honey frames. None of them can be considered the best or the ultimate, nor can any other methods be considered flawed. It is a very individual matter. Some hobby beekeepers use a hot know, some a steam knife, others use only the decapping fork or a simple kitchen serrated knife. And those beekeepers operating in larger beekeeping farms and apiaries with 20 or more hives tend to have automated machines that have spinning rotary blades or spikes that as the frames pass through, remove the top beeswax cappings. Some things to consider when starting out, is the volume of frames you are going to be processing. That will definitely have an impact on how you choose to remove the cappings. Other considerations may include your opinion and thoughts on say a hot gun may have on the quality of honey you produce. Another consideration is what to do with the cappings? Do you want beeswax? The work it takes to clean it, melt it, filter it and process it? Many don’t want the hassle and opt to scratch the cappings or use the heat gun.
As you get more familiar with your beehive and the honey frames you extract, you will find that the bees also produce varying shapes on the honey frame, and that too can be a problem and may alter your choice of beeswax decapping process you choose to try or adopt. In this video, we had a perfect frame, where the cappings were built outward by the bees and the cappings were ABOVE the actual timber frame. This makes it perfect for use of a hot knife, as the knife can be rested on the frames and simply slice off the wax cappings. Many frames however are not that way and the bees build them just below the full depth or height of the timber frames. In this scenario, a hot knife can do very little, and the only way to get the cappings off is to either scratch them or pull them off bit by bot using the decapping fork. This often leads to another debate we will cover in one of our future videos – should you use 10 frames or 9 frames in a full deep honey super? What are your thoughts? Leave us a comment below. Will the honey yield be higher or lower? Or the same? Will the hot knife cut through a much thicker overhang of honey comb? Will the running honey cool it too quickly slowing the whole process down? We are keen to hear your thoughts.
So as you can see, you will need to equip yourself with tools and skills to use them to accommodate several scenarios, each requiring a different method. Each honey frame will be different and may require use of two to three different styles even within the single honey frame.
We hope you enjoy our videos, and if you do, please click the SUBSCRIBE button. It helps us keep growing this channel and assist the much needed and very sparse new and young beekeepers. Hit the LIKE button and share.
We thank you for your support and hope you visit us again for our next video, where we will examine the use of a heat gun. Is this the method for you? Many say it is fantastically easy, fast and more efficient! We are keen to learn your thoughts on the matter after seeing our brief study.
Have an enjoyable day.
MahakoBees
https://www.mahakobees.com
Music composed, performed and provided by Groovey – Adam Kubát a Pavel Křivák
You can visit their website on: https://www.groovey.cz/
“For information please visit https://owners.nissanusa.com/nowners/. You will find quick reference guides and other useful information about your warranty, Bluetooth® system, and much more!
If your vehicle is equipped with automatic climate controls, this is your control panel. It is made up of two multifunction controls and several buttons. The two outer controls consist of a center button and an outer ring that works like a dial. If your vehicle is equipped with a different climate control system, see your Owner’s Manual for additional information.
The Auto mode may be used all year round. To turn it ON, press this button for automatic cooling or dehumidified heating. The indicator light illuminates when the system is activated. It will automatically regulate and maintain fan speed, airflow and temperature in the cabin. The Auto mode can be turned OFF by changing the fan speed, or by pressing the DEFROST or MODE button.
Your vehicle has separate temperature controls for the driver and front seat passenger. The driver’s TEMPERATURE CONTROL dial, on the left, will set the temperature for both the driver and passenger if the DUAL button is not activated. Turn the outside ring of the driver’s side control. You’ll see the temperature setting change on the center display as you turn the ring left for cooler, or right for warmer air.
If you want to adjust the passenger side temperature independently from the driver’s side, press the DUAL button, or turn the passenger side TEMPERATURE CONTROL dial. The DUAL indicator light will illuminate. Turn the dial left for cooler, or right for warmer air. The passenger’s side temperature will be displayed. To switch back to driver control, press the DUAL button again. If in Dual mode when you turn your system OFF, using the OFF button, it will resume Dual operation when turned back ON using the AUTO button.
The MODE button provides a choice of airflow outlets. Press the MODE button repeatedly to select from the following:
● Air will flow from center and side vents,
● Air will flow from center and side vents, and foot outlets,
● Air will flow mainly from foot outlets,
● Air will flow from the defroster and foot outlets, or
● Air will flow from the defroster outlets.
Press the A/C button to turn the air conditioning ON or OFF.
In hot or humid conditions, a visible mist may be seen coming from the vents. This does not indicate a malfunction.
To defrost or defog front and side windows, press the FRONT WINDOW DEFROST button. The indicator light will illuminate. airflow will be directed to the front and
side windows. The A/C automatically activates when the Defrost mode is selected and the outside temperature is above 36 degrees. This helps dehumidify the cabin and clear the windshield faster. Turn the driver’s side temperature to a setting that will best meet weather conditions. For windshield deicing, the temperature selector should be turned to maximum heat. Also, using the manual fan control, turn the fan speed to high.
If your vehicle happens to be in Dual mode, turning ON the defroster will automatically revert to driver control, allowing both sides of the windshield to defrost evenly. After the windshield is cleared, press the AUTO button to return to your previous settings.
To defrost or defog the rear window and, if so equipped, the outside mirrors, press the REAR WINDOW DEFROST button. The indicator light will illuminate. After defrosting, press to turn OFF. If not turned OFF manually, this feature will automatically deactivate in a period of time.
To recirculate air inside your vehicle, press this AIR RECIRCULATION button, its indicator will light up. This helps A/C efficiency and helps block outside odors from entering the cabin. You will only be able to activate the air recirculation feature when non-defroster airflow settings are selected. Press the FRESH AIR INTAKE button to allow outside air to be drawn into your vehicle. Please be aware that while in defrost modes, the air recirculation feature will not activate. Allowing outside air to enter the vehicle further improves defogging performance.
Press the fan control buttons to manually control fan speed. To turn the system OFF, press the OFF button.
There is a temperature sensor located on top of the dashboard, near the windshield, that helps regulate the automatic climate control settings. Please keep this area clear of papers and other materials.
Please see your Owner’s Manual for important safety information, system limitations and additional operating information.
”


