Wholesale PriceList for Precision Casting Wax to Argentina Factories

Wholesale PriceList for
 Precision Casting Wax to Argentina Factories

Short Description:

Product Detail

Product Tags

We always continually provide you with the most conscientious customer service, and the widest variety of designs and styles with finest materials. These efforts include the availability of customized designs with speed and dispatch for HVAC Electronic Switch , Auto Accessory Thermostat , Automobile Air Conditioning Thermostat , We are expecting to cooperate with you on the basis of mutual benefits and common development. We will never disappoint you.
Wholesale PriceList for Precision Casting Wax to Argentina Factories Detail:

Precision Casting Wax mainly is used for precision mechanical process with zero allowance or very limited allowance. We can not adopt general casting technique, but can only adopt zero allowance casting or precision casting. Because of the product’s structure is very delicate and complex especially in bejeweled with golden and silver, such as diamond ring, brooch, earring etc.

The characteristics of precision casting wax are: good coating property, no denaturalization to be heated, good flow ability, good thermal stability, and well surface finish.

0170411100427


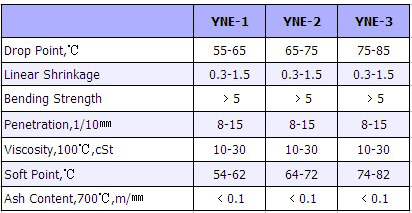
Product detail pictures:

Wholesale PriceList for
 Precision Casting Wax to Argentina Factories detail pictures


We're going to commit ourselves to giving our esteemed buyers using the most enthusiastically considerate solutions for Wholesale PriceList for Precision Casting Wax to Argentina Factories, The product will supply to all over the world, such as: Jersey , Kuwait , Thailand , We put the product quality and customer's benefits to the first place. Our experienced salesmen supply prompt and efficient service. Quality control group make sure the best quality. We believe quality comes from detail. If you have demand, let us work together to get success.


  • Climate control HVAC heater AC knob button light bulb (2002 2003 2004 2005 2006 Honda CR-V) for the buttons and knobs for night lights on the lower center console, where you control the AC and Heat, the “Climate Control” knobs on a 2003 Honda CR-V. This is my 2003 Honda CR-V EX and I used a Philips head screwdriver. (Same for ’02 ’03 ’04 ’05 ’06 CR-V)

    Part No. for bulb behind each knob: 79670-SL0-A01
    Part Description: Genuine Honda Neo-Wedge (14V 100Ma) Bulb

    Part No. for bulb behind each button: 79672-S3N-N41
    Part Description: Genuine Honda Neo-Wedge (14V 60Ma) Bulb


    https://www.etrailer.com/tv-demo_trailer_hub_magnet_replacement.aspx

    Videos are provided as a guide only. Refer to manufacturer
    installation instructions and specs for complete information.

    When one wheel does not seem to be stopping as quick as the others it may be because the brake magnet needs to be replaced. We put together a short video to help you recognize this problem and to show you how easy it is to fix it. Keep your trailer safe for yourself and others on the road by checking and replacing parts like the brake magnet when needed.

    What we are going to do is show you a few comparisons here. We took off another hub on the trailer right next to it. What happened was you can see on the hub on the left hand side there are actually rings on where the wheel studs are. It is also supposed to be more a flat finish compared to the new ones on the right hand side there. What happened was the magnet that was designed to wear on the hub has actually been riding on the hub too long when the brakes were not being used. It just happens that way. What happens is it wears down and makes those grooves and makes an uneven finish. What that uneven finish does is make the magnet not work so well. Like in this instance we had 3 wheels that were working great and this one which was not. This one has those grooves in there so that just deteriorates the performance of the brake. There is nothing you can do but replace the hub or find a brake shop that can actually plane that inside of the hub down to make it a flat finish again. It may be hard to find a shop to do that such as in our case. So we are just going to go ahead and replace the the hub with a new one considering that the inside bearing was worn down also. Since the hub is worn down we will have to replace the magnet to match the new flat face thats going to be on there.

    To replace our magnet here we have to do a few things. Release the magnet from this arm and cut these wires here. Also get them away from these clips here. Do save the clips because they do not come with the new magnet so you will need them to put it back on. First off we will just clip the wires off here. Next pull these clips off. Then to take the magnet off the arm you have to remove this clip here. The wires go through a fitting that kind of seals it off from the outside. What we need to do is punch that through from the inside. Now we just pass that junction and get some fresh wire. Then leave that alone and install our new magnet. We start off by installing our spring. It kinda just sets there in place. Slide on our new magnet. Make sure our wires are going the right way. It also comes with a new clip here that holds it into place. Lets go ahead and push that in. Might have to tap it on then make sure there is plenty of movement. If yours does not have that much movement maybe clean it up a little bit. Maybe a slight dab of grease but thats a last ditch effort. As long as it moves inside and out like that it will be just fine.

    Now what we are going to do is slide our wire clips back on. Then we will poke it through the hole, run it back through the plate here and let that lie. We then put these back where they used to be. Then we will put our little wire fitting back on there. It is kinda hard to tell but what it does is sets it into place and pushed together. Then it comes back through the plate. Once it gets plugged back into place we can redo our connections. Just for reference the magnets do not care about polarity as long as one wire goes to absolute ground and one wire goes to the power. We will go ahead and make some our connections with quick connects. Then our magnet install will be complete. We are using a gel filled quick connect. They work better for outside use. Take those and zip tie them to the back so they will not flop around or anything. Now we can just reinstall our hub.
    Videos are provided as a guide only. Refer to manufacturer
    installation instructions and specs for complete information.

    Send your message to us:

    INQUIRY NOW
    • * CAPTCHA: Please select the Key

    Related Products

    INQUIRY NOW
    • * CAPTCHA: Please select the Plane

    WhatsApp Online Chat !