
Factory Free sample Special Wax in Agriculture and Forestry Wholesale to Canada
Short Description:
Product Detail
Product Tags
Factory Free sample Special Wax in Agriculture and Forestry Wholesale to Canada Detail:
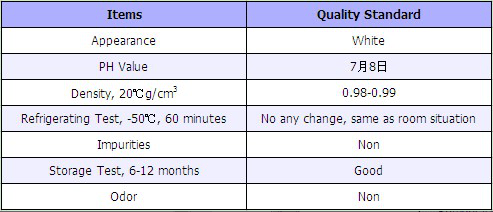
(1)YNE4 Series Special Molding Moisturized Wax for Fruit Trees
In order to protect fruit trees and shrubs from desiccation during winter dormancy or transportation or to keep moisture in summer drought, Special Molding Moisturized Wax is spayed on the surface of trees, forming the protecting film in surface of trees. The film has some adequate micro pore that could efficiently reduce the losses of moisture in the surface of the trees, and it simultaneously ensures physiological respiration of the trees.

(2) YNE5 Series Special Preventing Frostbite Wax for Trees
(3) In large northern areas of our country, the winter season is severe cold and the spring season is more heavy windy.
The early winter and the late spring’s frost are quite disadvantage to young plant, the weather is particularly abnormal coldness after spring comes, and frequently injures these trees. As a result young plant is cold death. YNE5 Series Special Preventing Frostbite Wax for Trees not only has anti-freezing effect on trees but also well effect on anti-sprouting etc. Spraying on branches and leaves of trees can make exuberant growth of foliage.
Product detail pictures:

We have been committed to offering easy,time-saving and money-saving one-stop purchasing service of consumer for Factory Free sample Special Wax in Agriculture and Forestry Wholesale to Canada, The product will supply to all over the world, such as: Brazil, America, Thailand, our qualify products have good reputation from the world as its most competive price and our most advantage of after-sale service to the clients.we hope we can provide a safe, environmental products and super service to our clients from all of the world and establish strategic partnership with them by our professional standards and unremitting efforts.
Is your climate panel on your 2003 to 2006 GM Chevy starting to fade? Are the icons looking blurred or scratched?
Trying to give your interior a new look?
Then order a set of Climate Control button Decals from ASI today.
These GM Chevy climate control button decals are so factory similar to the original look that you will not be able to tell the difference. Add this to your list of auto repairs and maintenance to enhance the overall Interior look of your vehicle.
All you need to do is flake off the old paint from your control panel and clean the panel using just a little bit of rubbing alcohol. After that, simply apply the specially Custom made decals to the panel, and within moments your climate control panel on your GM Chevy will look like its fresh off the showroom floor!
You can be sure that you will always get quality and trusted auto parts from
ASI Automotive Scientific Inc.
To Learn more, contact us at:
Toll Free- 1-866-983-6688
Website- https:// www.autoecu.com
Follow us at: https://plus.google.com/+tutorvista/
Check us out at https://chemistry.tutorvista.com/inorganic-chemistry/metallurgy.html
Blast Furnace
Modern furnaces are equipped with an array of supporting facilities to increase efficiency, such as ore storage yards where barges are unloaded. The raw materials are transferred to the stockhouse complex by ore bridges, or rail hoppers and ore transfer cars. Rail-mounted scale cars or computer controlled weight hoppers weigh out the various raw materials to yield the desired hot metal and slag chemistry. The raw materials are brought to the top of the blast furnace via a skip car powered by winches or conveyor belts.There are different ways in which the raw materials are charged into the blast furnace. Some blast furnaces use a “double bell” system where two “bells” are used to control the entry of the raw material into the blast furnace. The purpose of the two bells is to minimize the loss of hot gases in the blast furnace. First the raw materials are emptied into the upper or small bell. The bell is then rotated a predetermined amount in order to distribute the charge more accurately. The small bell then opens to empty the charge into the large bell. The small bell then closes, to seal the blast furnace, while the large bell dispenses the charge into the blast furnace.A more recent design is to use a “bell-less” system. These systems use multiple hoppers to contain each raw material, which is then discharged into the blast furnace through valves These valves are more accurate at controlling how much of each constituent is added, as compared to the skip or conveyor system, thereby increasing the efficiency of the furnace. Some of these bell-less systems also implement a chute in order to precisely control where the charge is placed.
The iron making blast furnace itself is built in the form of a tall chimney-like structure lined with refractory brick. Coke, limestone flux, and iron ore (iron oxide) are charged into the top of the furnace in a precise filling order which helps control gas flow and the chemical reactions inside the furnace. Four “uptakes” allow the hot, dirty gas to exit the furnace dome, while “bleeder valves” protect the top of the furnace from sudden gas pressure surges. When plugged, bleeder valves need to be cleaned with a bleeder cleaner. The coarse particles in the gas settle in the “dust catcher” and are dumped into a railroad car or truck for disposal, while the gas itself flows through a venturi scrubber and a gas cooler to reduce the temperature of the cleaned gas.The “casthouse” at the bottom half of the furnace contains the bustle pipe, tuyeres and the equipment for casting the liquid iron and slag. Once a “taphole” is drilled through the refractory clay plug, liquid iron and slag flow down a trough through a “skimmer” opening, separating the iron and slag. Modern, larger blast furnaces may have as many as four tapholes and two casthouses. Once the pig iron and slag has been tapped, the taphole is again plugged with refractory clay.The tuyeres are used to implement a hot blast, which is used to increase the efficiency of the blast furnace. The hot blast is directed into the furnace through water-cooled copper nozzles called tuyeres near the base. The hot blast temperature can be from 900 °C to 1300 °C (1600 °F to 2300 °F) depending on the stove design and condition. The temperatures they deal with may be 2000 °C to 2300 °C (3600 °F to 4200 °F). Oil, tar, natural gas, powdered coal and oxygen can also be injected into the furnace at tuyere level to combine with the coke to release additional energy which is necessary to increase productivity.
Please like our facebook page
https://www.facebook.com/tutorvista


