Europe style for U-1A00 thermal wax actuator for thermostatic automatic water drain valve for Poland Manufacturer
Short Description:
Product Detail
Product Tags
Europe style for U-1A00 thermal wax actuator for thermostatic automatic water drain valve for Poland Manufacturer Detail:
1. Operation Principle
The Thermostatic Wax that has been sealed in shell body induces expansion by a given temperature, and inner rubber seal part drives its handspike to move under expansion pressure to realize a transition from thermal energy into mechanical energy. The Thermostatic Wax brings an upward movement to its handspike, and automatic control of various function are realized by use of upward movement of handspike. The return of handspike is accomplished by negative load in a given returned temperature.
2. Characteristic
(1)Small body size, occupied limited space, and its size and structure may be designed in according to the location where needs to work.
(2)Temperature control is reliable and nicety
(3)No shaking and tranquilization in working condition.
(4)The element doesn’t need special maintenance.
(5)Working life is long.
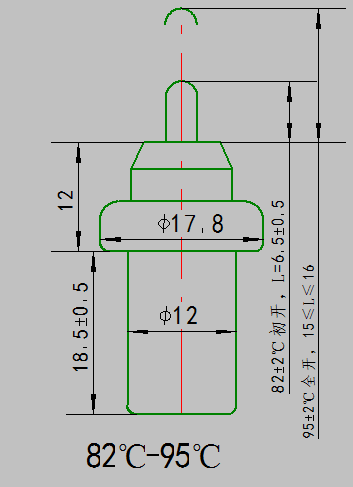
3.Main Technical Parameters
(1)Handspike’s height may be confirmed by drawing and technical parameters
(2)Handspike movement is relatives to the temperature range of the element, and the effective distance range is from 1.5mm to 20 mm.
(3)Temperature control range of thermal wax actuator is between –20 ~ 230℃.
(4)Lag phenomenon is generally 1 ~ 2℃. Friction of each component part and lag of the component part temperature cause a lag phenomenon. Because there is a difference between up and down curve of traveling distance.
(5)Loading force of thermal wax actuator is difference, it depends on its’ shell size.
Product detail pictures:

We always believe that one's character decides products' quality, the details decides products' quality ,with the REALISTIC,EFFICIENT AND INNOVATIVE team spirit for Europe style for U-1A00 thermal wax actuator for thermostatic automatic water drain valve for Poland Manufacturer, The product will supply to all over the world, such as: Oman , Nicaragua , Vietnam , We taking advantage of experience workmanship, scientific administration and advanced equipment, ensure the product quality of production, we not only win the customers' faith, but also build up our brand. Today, our team is committed to innovation, and enlightenment and fusion with constant practice and outstanding wisdom and philosophy, we cater to the market demand for high-end goods, to do experienced products and solutions.
Update: I just wanted say, someone had posted (then they subsequently deleted it) on video 3/3 that this video was incomplete and people should not watch it. I understand what they mean. Video 3/3 in this series cuts short at 37 secs because my battery died while I was making these videos. I decided to post the videos anyway because I figured a) people would remember for the most part where everything had been and be able to put it back in place and b) I also figured the encouragement a regular person (as opposed to a mechanically proficient person) would get from watching this video–that they can make repairs on their own vehicles, too–was worth posting a less-than-perfect video. So, go ahead and read my not-so-brief description below–it’s worth the read for the encouragment.
**********Link to Original Tutorial I Watched to Learn How to Replace Actuator***********
Here is the original tutorial I watched to learn how to replace the actuator. Their video is better for tutorial purposes–my video is more of an encouragement to non-fix-it type ladies who are feeling intimidated about working on their vehicle. https://www.youtube.com/watch?v=vqbJtTmkYfM
*******My Original Description Below*********
Okay, I’m just a housewife and homeschool mom. I’ve never done any work on cars pretty much ever. Before I was married, I checked the cars fluids on my own and made sure everything stayed at the proper levels, but that was it. My husband and I recently purchased a used 2007 Dodge Grand Caravan SXT. It had a handful of problems but I knew if we tackled it ourselves, we could fix the van up pretty well without spending much more. The driver side window worked intermittently (a default in the switch) and that same switch would stick when pressed downward for the automatic lowering of the driver side window. The other two major problems were the lock actuators in the sliding doors didn’t work. Hence, you couldn’t automatically lock and unlock the doors with a button or key fob. You had to reach around. Normally it’s not a big deal, but with three kids in a busy parking lot and the fact that van sliding doors aren’t designed to be easily unlocked manually from the driver side or passenger side door, it was a real nuisance. So I put together some VERY choppy footage (my camera doesn’t have a pause option while recording), but I didn’t have a tripod to set the camera on, so there are some weird shots where I’m trying to hold the camera and put things together as if I had three hands.
Regardless, the point of this, as exasperating as the process was, is that, if you’re a single mom, a woman on her own, a widow, or a wife whose husband is away on deployment or some other kind of work trip, you can do this! If you have plenty of money, go ahead and spend it–pay the mechanic $65 to do the work for you. However, if you don’t have a lot of expendable money and it’s a fix that isn’t deep in the recesses of the engine, take a chance! Look up the parts, search for tutorials on how to fix the thing (that’s how I learned how to do this! My husband searched for a tutorial and I jumped at the opportunity to try it). Now, as you’ll see in the videos, I did seek out my husband’s help on occasions. He is as mechanically minded as me–which is not much at all! So, I’m at no advantage having my husband help me except I got a break. On my end though, I’m in the middle of a nasty cold and we’re moving so time is scant and pressing, so I was eager to get a break if I could since I was so exhausted and could hardly breathe. Regardless of everything, I enjoyed most of the process. I hope you enjoy yours as well and you don’t get discouraged when things don’t go as smoothly for you as they seemed in the tutorial. I know they didn’t go smoothly for me! But I saved at least $130 in labor and I know I saved a lot in parts by ordering them online for well below the manufacturer’s suggested retail.
The above animation shows how a Horne thermostatic mixing valve or TMV works to proportion the mix of hot and cold water to provide blended water at a set temperature. The expansion and contraction of the internal thermostatic element moves a slide valve – altering the aperture of the hot and cold inlet ports to the inner mixing chamber thus constantly adjusting the blend of hot and cold water.
Thermostatic performance of the TMV can be verified by conducting a Cold Water Failure Test as shown in the animation: gradual failure of the cold water supply causes the thermostatic element to expand fully as it becomes increasingly bathed in hot water. This expansion moves the slide valve to the fully closed position over the hot port and thus flow at the outlet ceases. If the flow does not reduce to a dribble, then maintenance may be required to restore the valve to optimal performance.


